RUFFLES GALORE - VINTAGE MCCALLS 9361 WORK IN PROGRESS

How cute is the cover illustration on vintage McCall’s 9361?
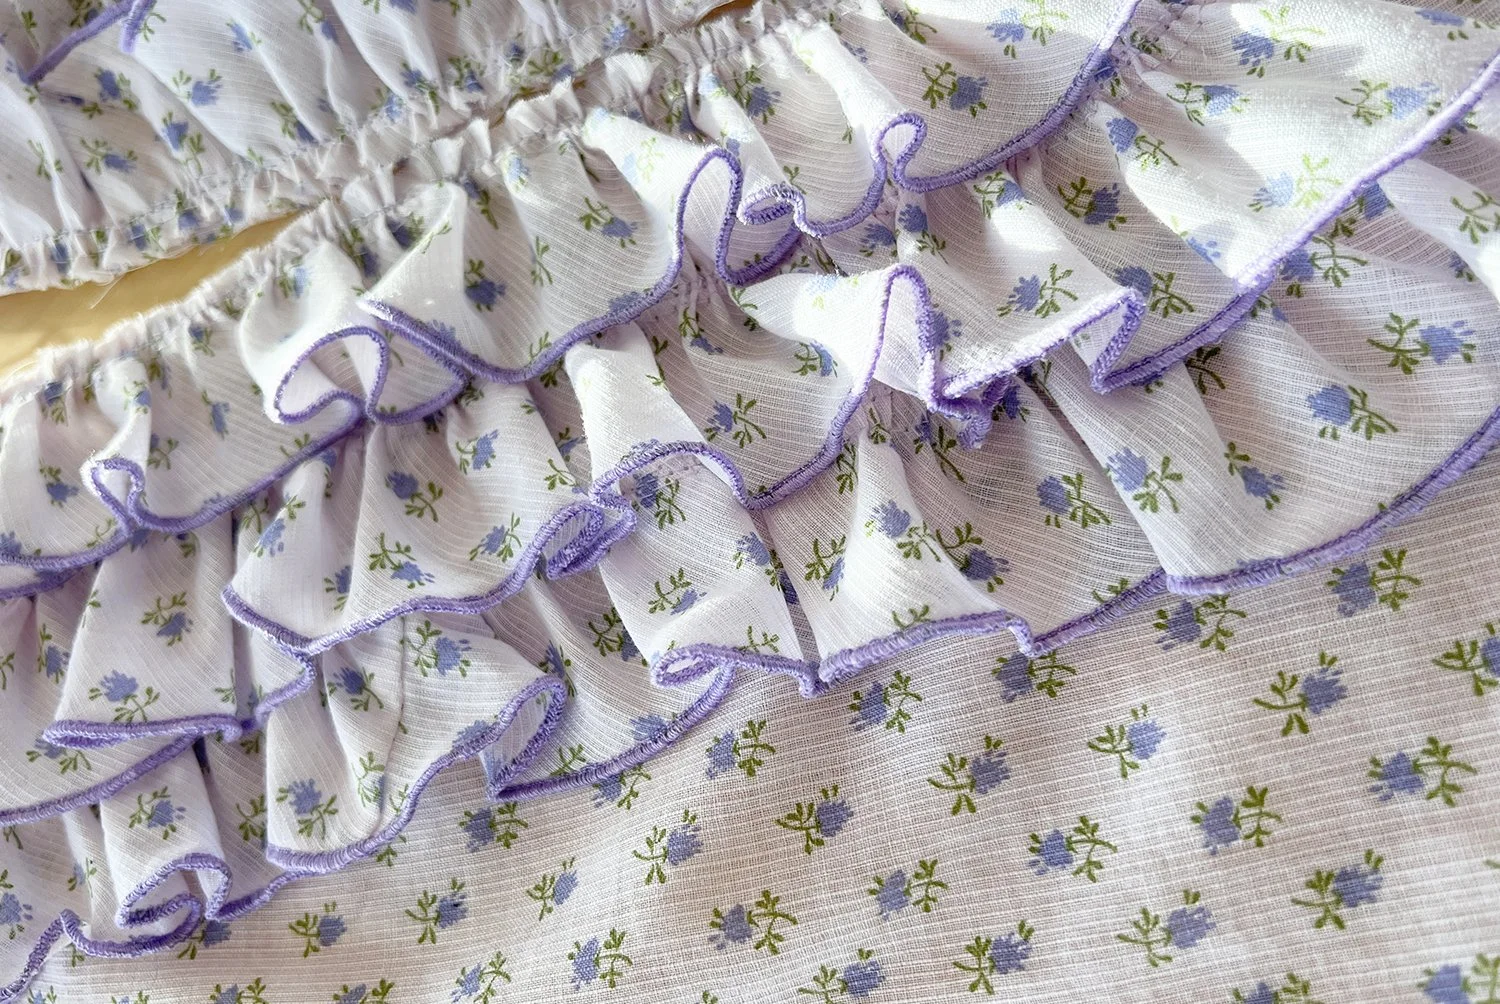
I just finished sewing vintage McCall’s 9361, and want to share some of my process, and how I arrived at making my ruffles the way I did. I hemmed over 10 yards of bias cut fabric on my serger, using a 3 thread narrow overlock stitch, to create the satiny edge of my ruffles. This took extra time and a lot of thread, but was absolutely worth the effort. The stitch looks super professional, like an industrial merrow stitch.

The L 890 produces an incredibly dense, narrow 3 thread overlock stitch, even on bias cut fabric.
STITCH:
Over the last few months, I’ve been spending a lot of time with my serger, the BERNINA L 890. I am a BERNINA brand ambassador, and I use this machine as part of that program. The L 890 is truly dazzling: a combination overlocker and coverstitch machine with chainstitch capabilities.

My serger finishing the edges of over 10 yards of bias cut ruffles.
The machine is user friendly, but I still found it a bit intimidating at first. It’s abilities are so above and beyond my previous serger! I’ve taken a scientific approach and made samples of every stitch the machine can make. I did this as an academic exercise, but the result? Creative inspiration!

My test ruffle - once I made this, I got super excited to work on this frothy design!
RUFFLES:
When most of us think of sergers, we think of creating garments with knit fabrics. But the reality of my sewing practice is that I favor wovens - and delicate ones, at that. As I made swatches using 2-thread and 3-thread stitches, my mind immediately went to ruffles.
Adding 3 layers of dense ruffles to the placket took patience, but it was really fun to watch it come together.
At the mere suggestion of ruffles, I dug out this pattern. It’s been in my queue for years now. What kept me from making it was an assumption that the fit would be too small or something. I took the tissue out of the envelope for the first time ever and was surprised by what I found.
PATTERN:
First of all, there are more pattern pieces than I expected. Every view has separate Front and Back bodice pieces, even though the differences between the pieces are pretty small (in one case, I am not sure if there is any difference).

Bias strips ready to be stitched into one continuous length of ruffles.
Meanwhile, for any ruffles, there is a short “guide” piece to indicate the width of fabric strips to be cut. The length of each ruffle is indicated in the directions. I went through the instructions and noted all of the lengths, and tallied them up to determine how much trim is required for the view I was making.
FIT:
Looking at the tissue, sizing seemed fine, but better safe than sorry. I took out McCall’s 7723 for comparison. I chose this pattern because I have made it before (and it fit), and to my eye, these two patterns are designed with a similar amount of ease.
Vintage size 12 McCall’s 9361 has very similar sizing to the current M7723. The vintage design has a higher armscye and quite frankly, more and better pattern markings. But as for fit, I felt confident that I could sew the vintage pattern, and it would fit me.

I love the instructions and illustrations for this pattern. They are good, but assume the reader has dressmaking experience.
SEAMS:
McCall’s 9361 has ⅝” seam allowances in places where you are directed to sew French seams - the shoulders, side seams, and sleeve seams. Everywhere else on the pattern has ¼” seam allowances, which are all enclosed. This gives the garment an extremely tidy interior. Since I planned to use my serger for the trim, I decided to forgo French seams, and use a 3 thread overlock to finish construction seam allowances.
FABRIC:
My fabric is from an antique mall. I paid $12 for 4 yards of 30” wide fabric. It is 100% cotton, very soft, a little prone to fraying due to the woven stripe design. Based on the width, it’s likely antique, but has been stored very well, and feels good as new.

You can see the 1/4” seam allowance is beginning to fray.
I was careful to handle this fabric minimally (honestly difficult with the way this shirt is constructed). The floaty quality of this fabric ended up being perfect, but the project would have been easier with something super crisp that does not fray (I’m thinking Liberty Tana lawn…but it doesn't have the soft drape of this floaty cotton).

Phew! Got the ruffles, collar, and placket on with those 1/4” seam allowances.
CONCLUSION:
This is a labor intensive garment, requiring a lot of precision. The drafting is excellent, but you need to nail it with your ¼” seam allowances, especially when sewing the placket. If not, things will get messy quickly. The pattern includes instruction to stay stitch and baste where necessary, and recommends using McCall’s newly published sewing book if you need additional guidance. All of these things guide you towards good sewing habits, which I really appreciate!
I’ll leave it here for now, but my next post will feature the finished garment with a full review of the pattern and all of my modifications. Thanks for tuning in! XO, Martha